Build a serverless website with SAM on AWS - part 2
April 22, 2020
In one of my previous articles Build a serverless website with SAM on AWS, I’ve explained how we can start creating a serverless website and what are the advantages of adopting a serverless architecture. Through sam-cli and Cloudformation templates we created an S3 bucket and a Cloudfront distribution. Now we will extend the previous architecture adding more functionality to our serverless website
In this article, we will explore how to create path rewrites (mod rewrites) and security headers using Lambda at the Edge (L@E). We will finish then attaching a custom domain name and taking care of assets caching to improve the performance of our serverless website.
Rewrites
Following the previous article, we have our website infrastructure at this point
and its deployed in AWS. Cloudfront is acting as a web server for your website
and forwards the requests to the origin following the behaviours declared
before. When navigating to HTML pages a classical webserver applies a series of
rewrites to the request before fetching the necessary resources. A good
example is mod_rewrite for Apache, in fact, we never request the homepage of a
website using a full resource location such as
www.izifortune.com/index.html but
rather using a shorter format like www.izifortune.com. Cloudfront provides
some basic functionalities using DefaultRootObject: index.html attribute,
which will point to a root index.html when we are not specifying any path in the
URL.
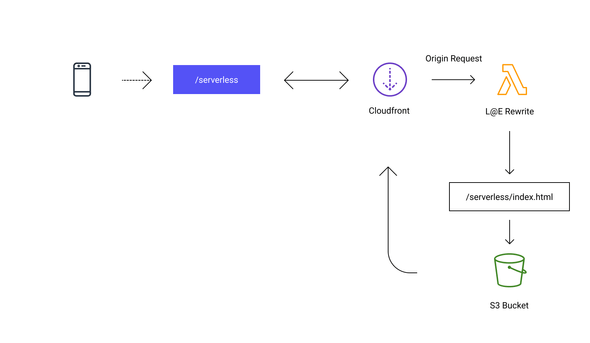
Once we start supporting multiple pages on our website, using
DefaultRootObject is not enough, to rewrite all the possible paths. A custom
solution is needed that can mimic a behaviour similar to mod_rewrite.
We can use Lambda at the Edge (L@E) to implement our custom business logic between Cloudfront and the origin, in our case S3 Bucket. L@E is a functionality of Cloudfront that lets you run our code on the edge. An edge is a Cloudfront Regional Cache. You can use different runtimes but mainly you are restricted to use node or python for the functions and you can see a full list of requirements and restrictions for L@E here. In the article, we will be using node runtime for the example functions.
The rewrite functionality can be then implemented with the following code:
'use strict'; exports.lambdaHandler = async (event) => {

  // Extract the request from the CloudFront event that is sent to
  Lambda@Edge const request = event.Records[0].cf.request;

  // Extract the URI from the request const olduri = request.uri;

  // Match any '/' that occurs at the end of a URI. Replace it with a
  default index const newuri = olduri.replace(/\/$/, '\/index.html');

  // Replace the received URI with the URI that includes the index page
  request.uri = newuri;

  // Return to CloudFront return request;
};
Save the lambda at the edge code using the following structure: rewrite/app.js
and then add the lambda as a resource, together with the necessary role, inside
the template.yaml
    ...
Resources:
    ...

  LambdaEdgeFunctionRole:
    Type: "AWS::IAM::Role"
    Properties:
      Path: '/'
      ManagedPolicyArns:
        - "arn:aws:iam::aws:policy/service-role/AWSLambdaBasicExecutionRole"
      AssumeRolePolicyDocument:
        Version: "2012-10-17"
        Statement:
          -
            Sid: "AllowLambdaServiceToAssumeRole"
            Effect: "Allow"
            Action:
              - "sts:AssumeRole"
            Principal:
              Service:
                - "lambda.amazonaws.com"
                - "edgelambda.amazonaws.com"

  RewriteLambda:
    Type: AWS::Serverless::Function
    Properties:
      CodeUri: rewrite/
      Description: 'Serverless rewrite lambda'
      Handler: app.lambdaHandler
      Runtime: nodejs12.x
      MemorySize: 128
      Timeout: 1
      Role: !GetAtt LambdaEdgeFunctionRole.Arn
      AutoPublishAlias: live
    ...
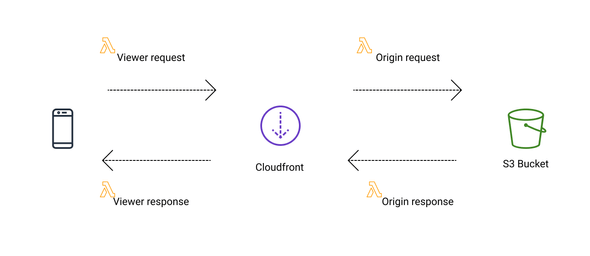
We now need to attach the function to Cloudfront, so that it will be possible to intercept the requests and rewrite to the relevant resources. A L@E can be attached at different points in a request flow:
The hooks provided by Cloudfront are divided into Viewer and Origin and then divided once more by request and response:
- Viewer request - Once Cloudfront receive the initial request
- Origin request - Before Cloudfront send the request to the origin
- Origin response - After Cloudfront receive the response from the origin
- Viewer response - Before Cloudfront returns the response.
If you want to read more about how to use the hooks you can visit the page Customzing Content at the Edge. In our example, we will attach the L@E to an Origin Request.
...
  WebsiteCloudfrontDistribution:
    Type: "AWS::CloudFront::Distribution"
    Properties:
      DistributionConfig:
        Aliases:
            - <ADD YOU ALIASES HERE>
        Comment: "Cloudfront distribution for serverless website"
        ViewerCertificate:
          AcmCertificateArn: <CERT HERE>
          MinimumProtocolVersion: TLSv1.1_2016
          SslSupportMethod: sni-only
        DefaultRootObject: "index.html"
        Enabled: true
        HttpVersion: http2
        Origins:
          - Id: s3-website
            DomainName: !GetAtt Bucket.DomainName
            S3OriginConfig:
              OriginAccessIdentity:
                Fn::Sub: 'origin-access-identity/cloudfront/${CloudFrontOriginAccessIdentity}'
        DefaultCacheBehavior:
          Compress: 'true'
          AllowedMethods:
            - GET
            - HEAD
            - OPTIONS
          ForwardedValues:
            QueryString: false
          TargetOriginId: s3-website
          ViewerProtocolPolicy : redirect-to-https
          LambdaFunctionAssociations:
            - EventType: origin-request
              LambdaFunctionARN: !Ref RewriteLambda.Version
Noticed that we can only attach a specific Version of the function in
Cloudfront. Using the attribute AutoPublishAlias:live in the lambda
definition SAM takes care of publishing and giving us the latest version.
We can start testing out the lambda packaging and deploying it with SAM. Since we will need a package and deploy multiple times we can create scripts to avoid repeating long commands:
# package.sh sam package --output-template-file packaged.yaml --s3-bucket
<YOURSWEBSITE.COM>-sam

# deploy.sh sam deploy --template-file packaged.yaml --stack-name
<yourwebsite> --capabilities CAPABILITY_IAM --region us-east-1",
And then proceed to invoke the commands:
sh package.sh && sh deploy.shSecurity headers
While developing a website it is important to consider also security for the website itself and our users. Today’s standards include having your website using HTTPS protocol which you can achieve by attaching a valid certificate to Cloudfront distribution which we will see later when looking to add a domain. A sometimes overlooked practice which can boost the security of your website is using correct security headers. A full list of headers can be found in the OWASP Secure Headers Project. HTTP headers can be used to restrict modern browsers from running vulnerabilities.
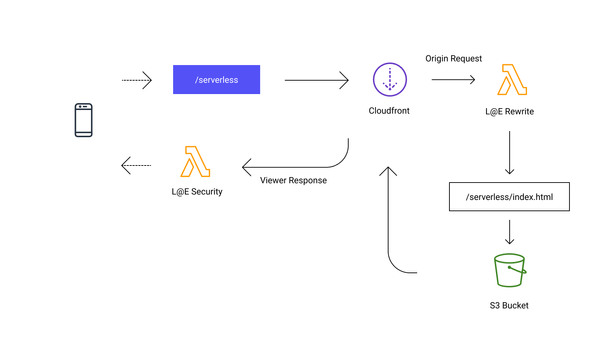
Attaching headers to a response is the job a web server but in our case, we don’t have any. That’s where a L@E can help us out. Using the Viewer Response hook, which triggers before Cloudfront return the response we can add the additional security headers to the response.
The function below contains all the necessary logic:
exports.lambdaHandler = async (event) => {
  const { Records: [{ cf: { response } }] } = event;

  if(response.headers['content-type'] && response.headers['content-type'][0].value.indexOf('text/html') < 0 ||
    response.headers['location']) {
    return response;
  }

  response.headers = {
    ...response.headers,
    ['strict-transport-security']: [{key: 'Strict-Transport-Security', value: 'max-age=63072000; includeSubdomains'}],
    ['x-content-type-options']: [{key: 'X-Content-Type-Options', value: 'nosniff'}],
    ['x-frame-options']: [{key: 'X-Frame-Options', value: 'SAMEORIGIN'}],
    ['x-xss-protection']: [{key: 'X-XSS-Protection', value: '1; mode=block'}],
    ['referrer-policy']: [{key: 'Referrer-Policy', value: 'same-origin'}],
  };
  return response;
};
Similar to the previous L@E that we created for rewrites we need now to create a Resource and attach the L@E to our Cloudfront distribution.
..
  WebsiteCloudfrontDistribution:
    Type: "AWS::CloudFront::Distribution"
    Properties:
      DistributionConfig:
        Aliases:
            - <ADD YOU ALIASES HERE>
        Comment: "Cloudfront distribution for serverless website"
        ViewerCertificate:
          AcmCertificateArn: <CERT HERE>
          MinimumProtocolVersion: TLSv1.1_2016
          SslSupportMethod: sni-only
        DefaultRootObject: "index.html"
        Enabled: true
        HttpVersion: http2
        Origins:
          - Id: s3-website
            DomainName: !GetAtt Bucket.DomainName
            S3OriginConfig:
              OriginAccessIdentity:
                Fn::Sub: 'origin-access-identity/cloudfront/${CloudFrontOriginAccessIdentity}'
        DefaultCacheBehavior:
          Compress: 'true'
          AllowedMethods:
            - GET
            - HEAD
            - OPTIONS
          ForwardedValues:
            QueryString: false
          TargetOriginId: s3-website
          ViewerProtocolPolicy : redirect-to-https
          LambdaFunctionAssociations:
            - EventType: origin-request
              LambdaFunctionARN: !Ref RewriteLambda.Version
            - EventType: viewer-response
              LambdaFunctionARN: !Ref SecureHeadersLambda.Version
We have to package and build our SAM application once again:
sh package.sh && sh deploy.shCaching
A proper caching strategy is essential for any website no matter the number of visits per day. Defining caching for your assets can really make the difference for your users, which they will save bandwidth and improve performance. A request in fact doesn’t need to be fetched from the origin every time. Cloudfront honour the Cache-Control header of a response and it will keep the requested asset in a regional cache until the cache duration expires. Moreover, it can reduce the load to our servers, or in our case our bill, since we are paying every request that arrives at the S3 Bucket. If you want to read more about Cache-Control header I can’t recommend enough the article from @csswizardry Cache-Control for Civilians.
While Cloudfront allows to overrides the Cache-Control headers through a behaviour, I normally recommend setting a Cache-Control header on an object base level rather than through a behaviour. This way you don’t need to manage multiple behaviours on different objects.
Cloudfront can read the object metadata, specifically the Cache-Control metadata that is set in an S3 asset and will use it as Cache-Control header for the response.
Depending on the assets that you are uploading you can have a different Cache-Control associate to them.
aws s3 sync public/ s3://<YOURSWEBSITE.COM> --cache-control "public, max-age=604800, must-revalidate" --acl "public-read" --exclude "*" --include "*.html" --include "*.xml" --include "sw.js" --include "robots.txt" --include "favicon.ico" --include "manifest.webmanifest" --include "idb-keyval-iife.min.js"

aws s3 sync public/ s3://<YOURSWEBSITE.COM> --exclude "*.html" --exclude "*.xml" --exclude "sw.js" --exclude "robots.txt" --exclude "favicon.ico" --exclude "manifest.webmanifest" --exclude "idb-keyval-iife.min.js" --cache-control "public,max-age=31536000,immutable" --acl "public-read"
We are caching here the HTML pages for 7 days and all the other assets instead for 1 year.
Domain name
Now that the basic resources are defined I want to have a closer look at how to link your domain name to a serverless infrastructure. I will take advantage of AWS Route 53 to generate the necessary RecordSet and Certificate Manager to create an SSL certificate. If you don’t have your domain registered in AWS you simply need to change the Nameservers to point to your public hosted zone which you will create.
There is one manual step which I’m keeping outside of the final template, the SSL certificate creation. The certificate needs to be validated through email or DNS for the domains specified and it will fail to create the Cloudfront distribution if it is not verified. For this reason, you can simply go to https://console.aws.amazon.com/acm/home?region=us-east-1#/ and register a new certificate. Make sure the region is N.Virginia because Cloudfront will only accept certificates from that region. If you want to serve your website using www remember to include it also inside the list of the accepted domains.
Once it is created and verified we can copy the arn and include it in your template. Now we can add the SSL certificate and the domain name aliases to the Cloudfront distribution.
...
  WebsiteCloudfrontDistribution:
    Type: "AWS::CloudFront::Distribution"
    Properties:
      DistributionConfig:
        Aliases:
            - <ADD YOU ALIASES HERE>
        Comment: "Cloudfront distribution for serverless website"
        ViewerCertificate:
          AcmCertificateArn: <CERT HERE>
          MinimumProtocolVersion: TLSv1.1_2016
          SslSupportMethod: sni-only
After the certificate is associated we need to add an HostedZone, a record container in Route53 where you can control how to route the traffic fo a specific domain through RecordSet.
  HostedZone:
    Type: AWS::Route53::HostedZone
    Properties:
      HostedZoneConfig:
        Comment: yourwebsite.com hosted zone
      Name: yourwebsite.com
  RecordA:
    Type: AWS::Route53::RecordSet
    DependsOn: WebsiteCloudfrontDistribution
    Properties:
      HostedZoneId: !Ref HostedZone
      Name: <yourwebsite>.com
      Type: A
      AliasTarget:
        DNSName: !GetAtt WebsiteCloudfrontDistribution.DomainName
        HostedZoneId: Z2FDTNDATAQYW2
  RecordAAAA:
    Type: AWS::Route53::RecordSet
    DependsOn: WebsiteCloudfrontDistribution
    Properties:
      HostedZoneId: !Ref HostedZone
      Name: <yourwebsite>.com
      Type: AAAA
      AliasTarget:
        DNSName: !GetAtt WebsiteCloudfrontDistribution.DomainName
        HostedZoneId: Z2FDTNDATAQYW2
  RecordWWWA:
    Type: AWS::Route53::RecordSet
    DependsOn: WebsiteCloudfrontDistribution
    Properties:
      HostedZoneId: !Ref HostedZone
      Name: www.<yourwebsite>.com
      Type: A
      AliasTarget:
        DNSName: !GetAtt WebsiteCloudfrontDistribution.DomainName
        HostedZoneId: Z2FDTNDATAQYW2
  RecordWWWAAAA:
    Type: AWS::Route53::RecordSet
    DependsOn: WebsiteCloudfrontDistribution
    Properties:
      HostedZoneId: !Ref HostedZone
      Name: www.<yourwebsite>.com
      Type: AAAA
      AliasTarget:
        DNSName: !GetAtt WebsiteCloudfrontDistribution.DomainName
        HostedZoneId: Z2FDTNDATAQYW2
Conclusion
I’ve collected the templates and functions in this Github repo https://github.com/izifortune/serverless-website-sam ready for you to clone. You can easily build and deploy your serverless website on AWS. If you don’t like working with YAML files or SAM you can have a look at the AWS CDK which provides pre-made examples on how to build and deploy a static website in AWS.


